If you follow me on Instagram then you may have seen my recent DIY field trip shirt (if you don't follow me on instagram feel free to find me HERE, I love new insta-friends).
The technique I used for the shirt is one that I've used for the last few years in creating gifts. With the addition of my Cricut Explore recently, I am making and creating shirts left and right. If you were interested in making your own, read on to see how I did mine!
And don't worry if you don't have a cutting machine, there's an option for you too!
Supplies:
Freezer paper (Super cheap and lasts forever)
Iron & Ironing Board
Piece of Cardboard (roughly the size of your design)
Fabric paint (I preferred Tulip Brand fabric paint in soft or slick)
Cricut OR X-Acto Knife
(If you are using the Cricut, you'll also need your mat and computer)
Step #1
Create.
Sketch it, design it on Power Point, use Cricut Design Studio, whatever floats your boat to create your design. Since I was using my Cricut, I did my design in the Cricut Design Studio.
Step #2
Cut.
OPTION 1: By Machine
Using your cricket, cut the design on to freezer paper just like you would regular paper. I recommend using a newer mat because you don't want the paper to unstick, it is very thin and can rip easily. Make sure you place the paper shiny side down.
OPTION 2: By Hand
If you don't have a cutting machine, this step will be the longest for you. You will need to trace the design onto the freezer paper. Make sure the shiny side is facedown. Once you have the design, you'll need to cut it out.
Step #3
Iron.
Depending on your design, this too can be a bit of work. Remember that you need to iron down each of the small pieces. For the bus in my design this took a bit of patience. I recommend placing the small pieces one at a time and then applying the iron directly down. Once the paper is heated, use a circular motion to smooth out the edges.
Depending on your design, this too can be a bit of work. Remember that you need to iron down each of the small pieces. For the bus in my design this took a bit of patience. I recommend placing the small pieces one at a time and then applying the iron directly down. Once the paper is heated, use a circular motion to smooth out the edges.
Step #4
Paint.
(This is wear your cardboard comes in handy so the paint doesn't soak through.)
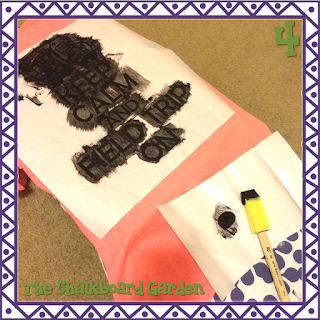
I use a cheap-o dollar store sponge brush for this. Start with a dabbing motion to get most of the fabric covered. Then use a brushing motion going from the paper on to the fabric so that you don't accidentally push paint under the paper.
Step #5
Remove Paper.
For best results, remove the paper before the paint is entirely dry. Once the pain is dry it becomes more plastic-y and elastic-y and I've had paint peel right off the fabric because I let it dry completely and it sealed to the paper. If you pull the paper while it's still drying, the paint will seal better to the fabric. Tweezers and patients are your best friends here.


Oh my goodness - the shirt looks great and so easy!
ReplyDeleteThanks for sharing this great idea!
-Susanna
They are super easy, which is why I love sharing this idea. I am a money saver whenever I can be and this is a huge saver for me! Thanks for stopping by!
DeleteThe blog post is absolutely fantastic! Lot of information is helpful in some or the other way. Keep updating the blog, looking forward for more content...Great job, keep it up. To get More Visit
ReplyDeletescreen printing machine
Very nice keep sharing! i have also a business we are offering wide range of the facilities as one of the well-known manufacturer of the automatic screen printing machine. visit here for more information - https://aspesite.com/
ReplyDelete